I LOVE decorating for the holidays. Bringing out my Halloween/Thanksgiving/Christmas boxes from the garage in early October gives me such a thrill. When Fernando and I first got married, we had absolutely zero holiday stuff of our own. In fact, we didn't even get a Christmas the first few years of our marriage. We lived in an apartment and hardly anyone every came over to visit us for the holidays (we usually had to trek out to our families' homes for celebrations), so it just didn't make sense. BUT, I did start shopping for holiday stuff. Our apartment did have a little balcony, and our front door faced many of our neighbors. Since most of the neighbor's were families with kids, I did buy my first couple of strings of Christmas twinkle lights (green and white) and hang them up on our balcony. "It's for the kids," was my excuse.
Since those first few sparsely decorated holidays, I've been keeping my eye out for inexpensive, but nice decorative pieces. I live wreathes, yard signs, and gel clings because our current front door has glass panes. I've found great holiday decor items at places like Ross, Marshall's, Target, Michael's, The Dollar Tree, even at Rite-Aid and CVS. With a little creativity, you can turn simple, inexpensive items into a great winter holiday display. I use a lot of inexpensive tinsel every year to add sparkle to our living room. Gathered together in bunches, with candles nearby--it creates a lovely little glow/reflection of light.
Now that we've been married for 6 years, and are therefore about to celebrate our 6th Christmas together, I've amassed quite a collection. I'm so excited to really get decorating on Friday. I usually have a "one holiday at a time" rule, and try to refrain from putting up Christmas decorations earlier than the day after Thanksgiving. But, I made an exception this year since we've invited some friends over tonight for a little "fancy beer" party. I made something I'm quite proud of. And it all started with Pinterest. If you don't know what Pinterest is--you're missing out. It is this website where you can share ideas visually through virtual "pin boards." I have a board titled "Holidaze." First of all--Pinterest is FILLED with lovely examples of holiday decor, but my board only features ideas that are cheap and easy enough for even me to do. I lack the patience for more delicate DIYs . . .
So, without further ado, I'd like to share my first Pinterest inspired holiday DIY I ACTUALLY DID: It all started with this photo:
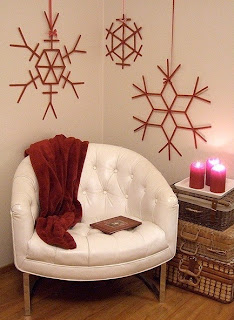 |
| I don't know the source of the photo--Pinterest blocked it |
Those little snowflakes hanging on the wall are made our of popsicle sticks! I immediately thought: "That's so easy, even I can do that!" Also, it happened to be an extremely affordable DIY project.
I went to my local Michael's craft store and bought a box of 1000 popsicle sticks for $8.99, a bottle of white paint for 59 cents, and I was in business. I already owned a hot glue gun and plenty of paint brushes, so that expense was already part of my standard "crafts box." NOTE: While I easily could have purchased the box of 500 popsicle sticks for $5.99, I went with the box of 1000 because I'm sure I can use the rest for some other DIY. the wheels are already turning . . .
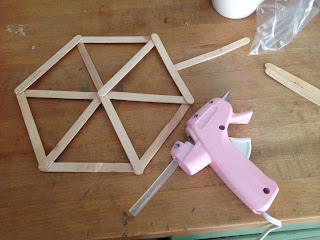
So, using this picture as my inspiration, I got to gluing. I definitely recommend using hot glue (versus Elmer's glue) because it dries almost instantly and gives the whole structure more stability.
.JPG) |
| Gluing my first snowflake together |
One thing I learned about popsicle sticks through this craft project is: they are a lot like snowflakes themselves, no two are alike. Be careful to sort through your sticks to find smooth ones without cracks or ones that are wonky. Some of the sticks in my box had the tip cut off one end, making them shorter than the rest.
.JPG) |
| First finished product--not bad! |
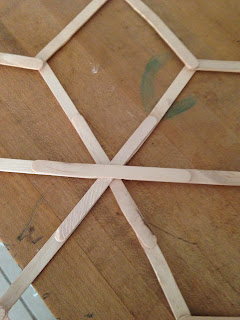
So, snowflakes, by nature are hexagonal. You have to have 6 sticks in the center. The first snowflake I made is "thick" because the center is 6 sticks thick (say that 5 times fast!). One my second go-around, I was able to use just three sticks to start the first spoke of 6.
.JPG) |
| Three sticks glued together to make the first spoke. |
Once you make the "spoke" you can glue 6 sticks onto each end to start your snowflake, as you can see in the picture above.
.JPG) |
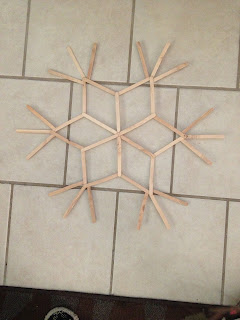
| Second finished snowflake |
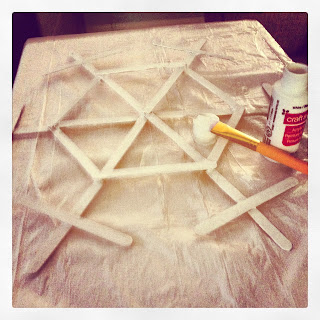
Then it was time to paint my snowflakes. So, I learned a couple things through this painting process. The first is--if I was a smarter person, I would have painted the sticks BEFORE I started gluing them together. They would have been much easier to paint if they were just all lined up flat with no spaces in between. I think I also would have used less paint. Either way, learn from my mistake if you plan to make these snowflakes for yourself. The only hard part about that is you have to count out how many sticks you'll before hand. I think the largest snowflake I made used 48 sticks and the smaller ones had 30-36 sticks. Remember--they have to be in multiples of 6 (plus 3 if you use my three sticks in the middle technique).
.JPG) |
| Me, painting my snowflakes "the hard way" |
I painted both sides of each snowflake, so this was the most time consuming part of the project. I wanted to make sure none of the original wood color showed through. You could paint your snowflakes any color you want, or even leave them the natural wood color (or stain them!). I liked the look of the natural wood very much--it had a very "homespun" look. These snowflakes kind of remind me of Sweden or something. The natural wood snowflakes might look good tied up with burlap, twine, or red/green yarn for a more rustic look. I debated adding glitter to these (which I think would also look fantastic). Glitter could be added en masse using a spray adhesive and loose glitter. Here's another trick I use when doing painting projects. Use a plastic trash bag as a drop cloth. The projects will stick less to plastic than paper. Plus, once the bag dries, I can still use it as a trashbag.
.JPG) |
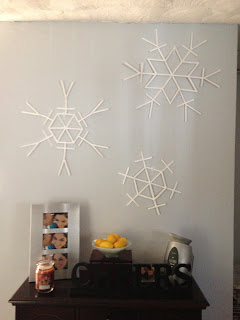
| The finished project |
Once the paint dries on both sides, you're ready to hang up your snowflakes. I liked the idea of hanging up the snowflakes with ribbon like the Pinterest picture, but I chose to use some of those reusable mini plastic hooks from 3M. I like that I can place them just about anywhere without damaging my walls. Without the ribbon, I think it also gives my snowflakes the illusion that they really are just floating down my wall. These are hanging above my bar since it is the focal point as soon as you enter my house. I think they will add a touch of winter whimsy to our little party tonight, and will continue to hang there well into the New Year.
Stay tuned for more Pinterst-inspired holiday craft projects and decorating ideas!


.JPG)
.JPG)
.JPG)
.JPG)
.JPG)
.JPG)

.JPG)